360 virtual tours have seen a massive rise in popularity, especially in the real estate industry. Today, 77% of buyers want to take a 360 virtual tour before visiting a property in person, and 62% say they prefer working with an agency that offers this technology.
This trend gained significant momentum during the COVID-19 pandemic, permanently shifting consumer behavior. But real estate isn’t the only industry leveraging this immersive tool—sectors like interior design, tourism, sports, construction, drone photography, and more are also benefiting from 360 virtual tours.
But how can you use 360 virtual tours to boost sales and improve customer experience?
And most importantly, how do you create a 360 virtual tour that is engaging and effective?
This detailed guide will walk you through the process of creating a 360 virtual tour, helping you build engaging and interactive experiences that captivate your audience.
Why you should use 360 Virtual Tours
A 360 virtual tour is more than just a marketing tool—it’s a game-changer offering numerous benefits for businesses:
✅ Increased engagement: The immersive experience naturally captures and retains attention.
✅ Improved Conversion Rates: Customers can better visualize spaces, making them more likely to purchase or book.
✅ Competitive Advantage: Stand out by providing an innovative, interactive experience.
✅ Time and Cost Savings: Reduce unnecessary in-person visits and expedite decision-making.
Whether you’re a real estate agent, architect, retailer, or travel professional, incorporating 360 virtual tours into your strategy can revolutionize how you showcase spaces and services.
Prerequisites to create a 360 virtual tour
A 360 virtual tour is created by assembling multiple 360-degree photos, each representing a different space or viewpoint (such as a room in a house, a showroom, or an exhibition hall). These images are connected with interactive hotspots, enabling seamless movement within the virtual space.
Before you begin
✅ New to 360° photography? Check out our beginner’s guide to 360-degree photography.
✅ Looking for the right 360 camera? Explore our comparison of the best 360 cameras.
✅ Already have a 360 camera? You’re ready to start creating your 360 virtual tour!
Make your first 360 virtual tour
Step 1: Upload your 360° images
Creating a 360 virtual tour with Panoraven is quick and easy. The virtual tour feature is part of our premium service, but you can sign up for a free 10-day trial (no credit card required).
The first step in creating your 360 virtual tour is uploading your 360-degree images.
Once logged in, go to your dashboard and click the ‘upload’ button.
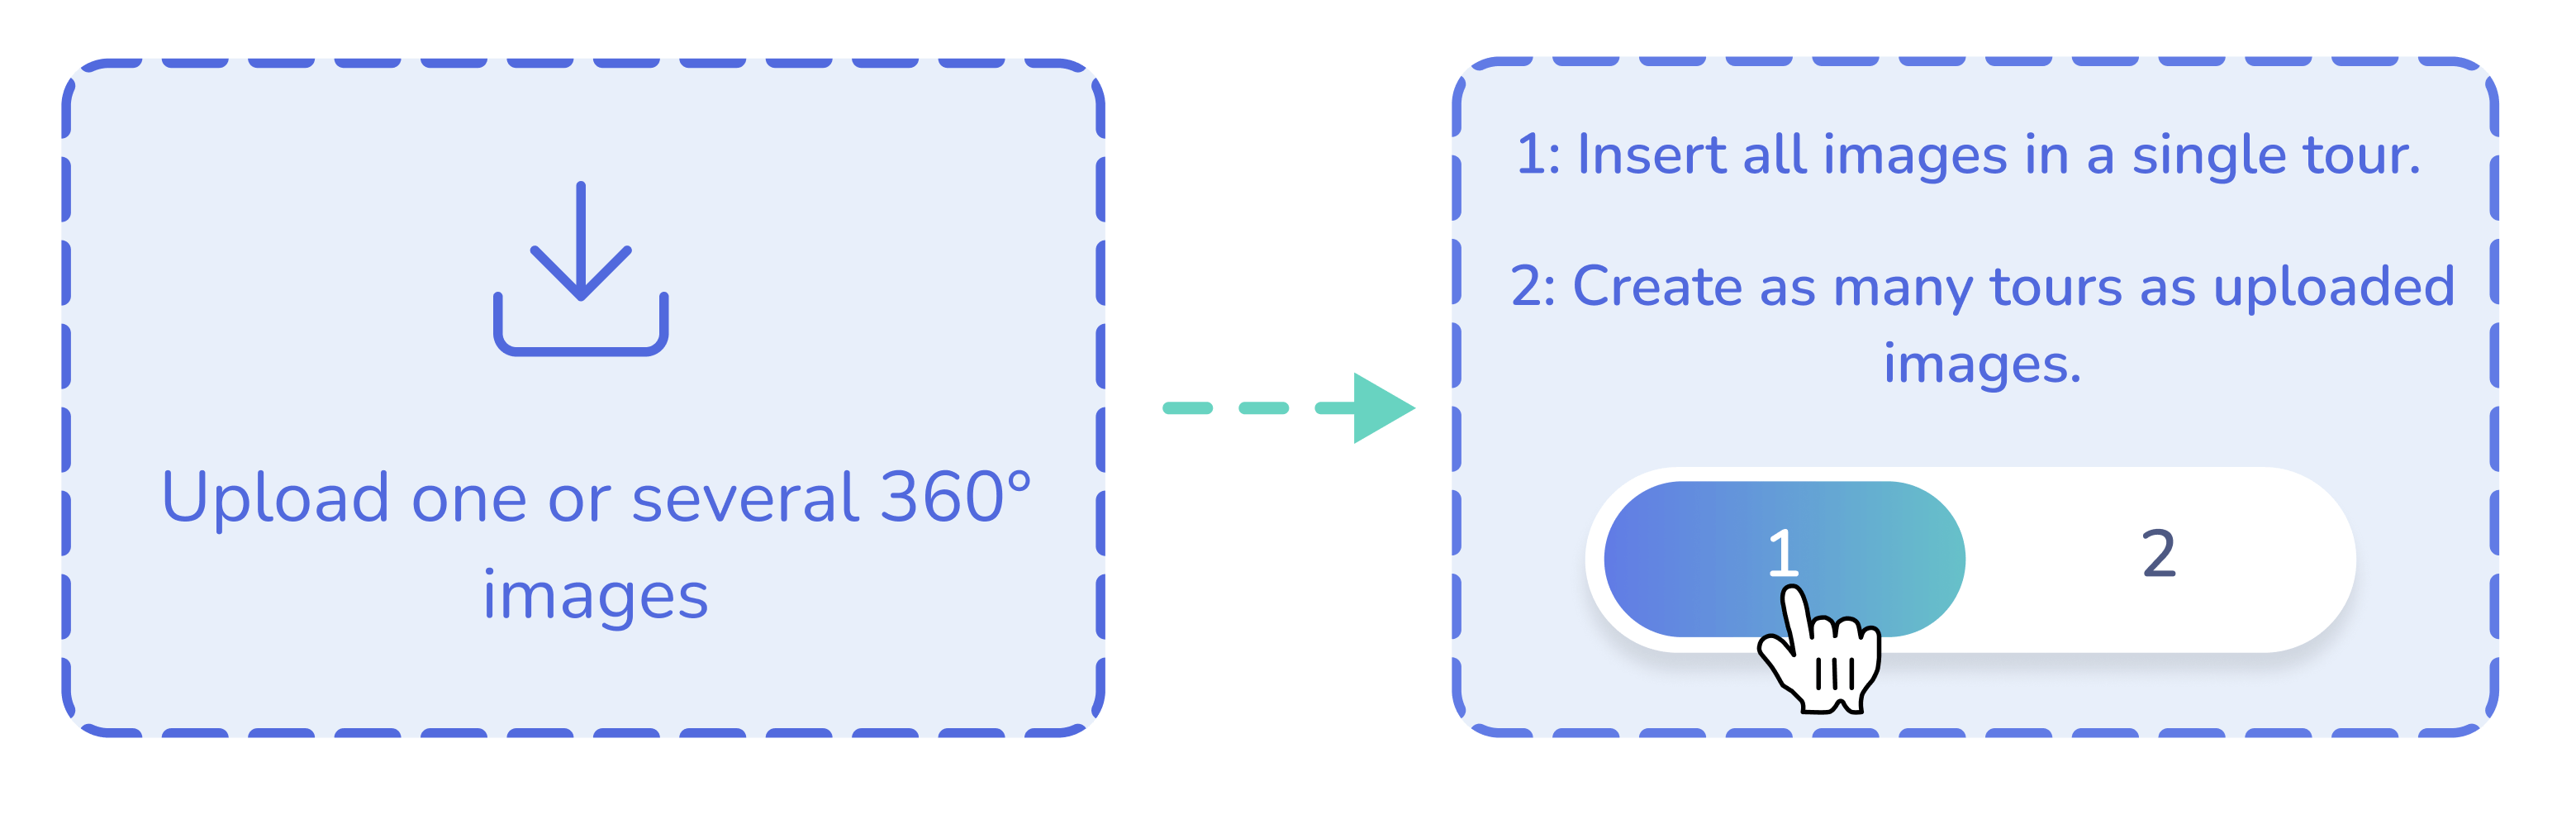
Select the images from your computer, then choose ‘Option 1’ to add all images to the same virtual tour.
After uploading the images, you’ll enter the interactive 360° viewer to start creating your virtual experience.
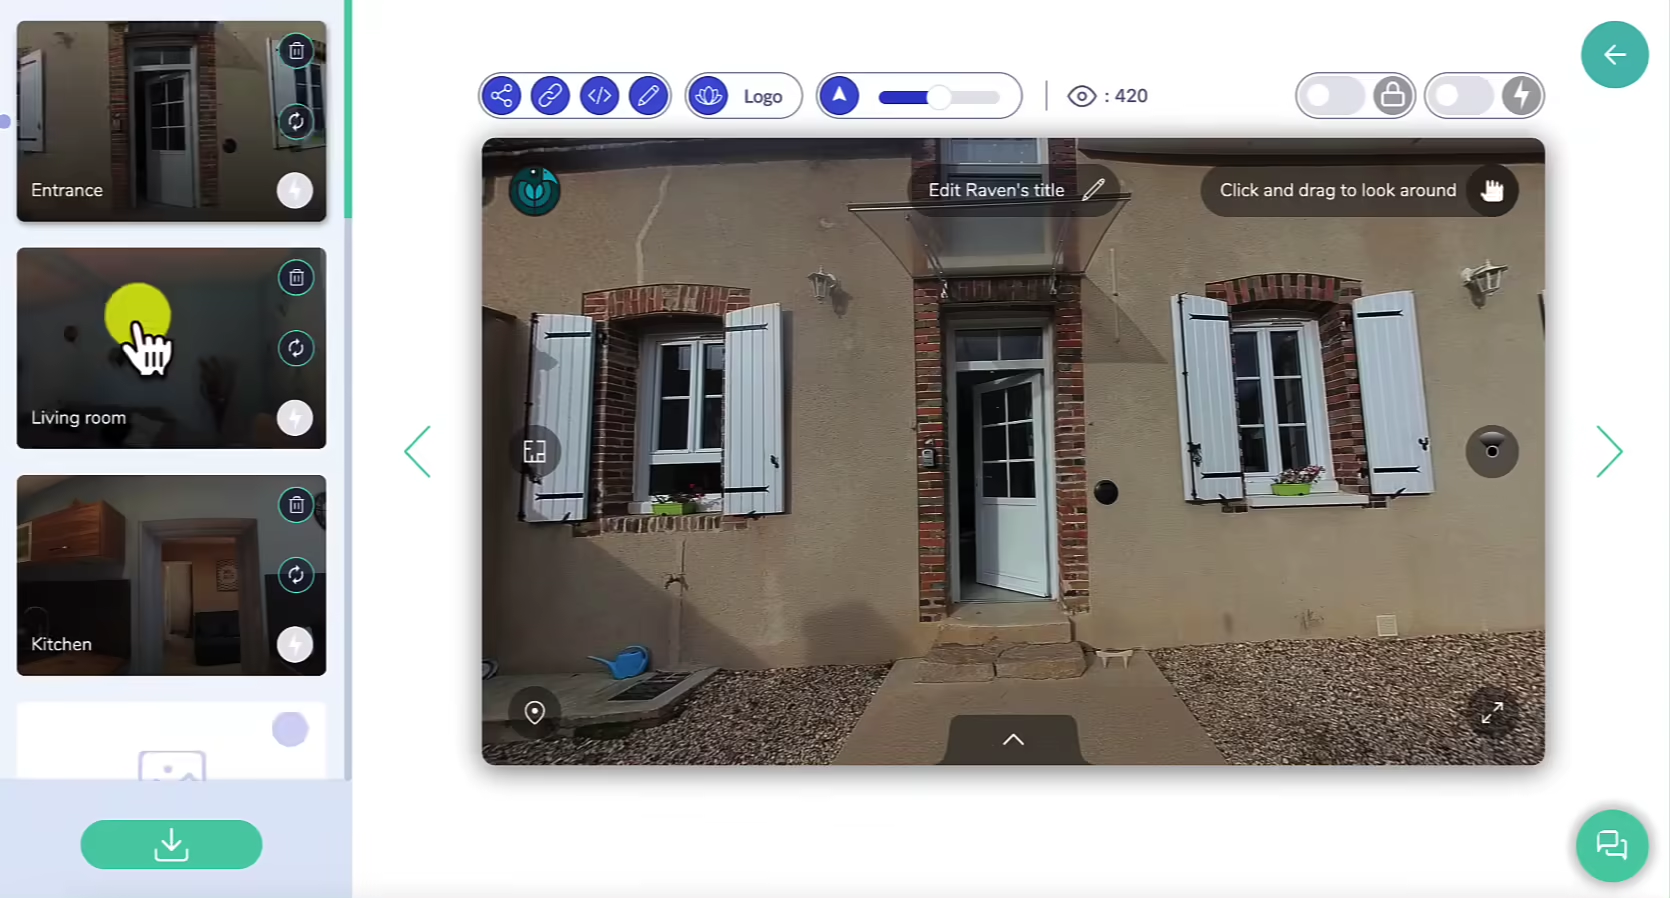
Step 2: Organizing and structuring the virtual tour
A well-organized 360 virtual tour ensures smooth navigation and a seamless user experience.
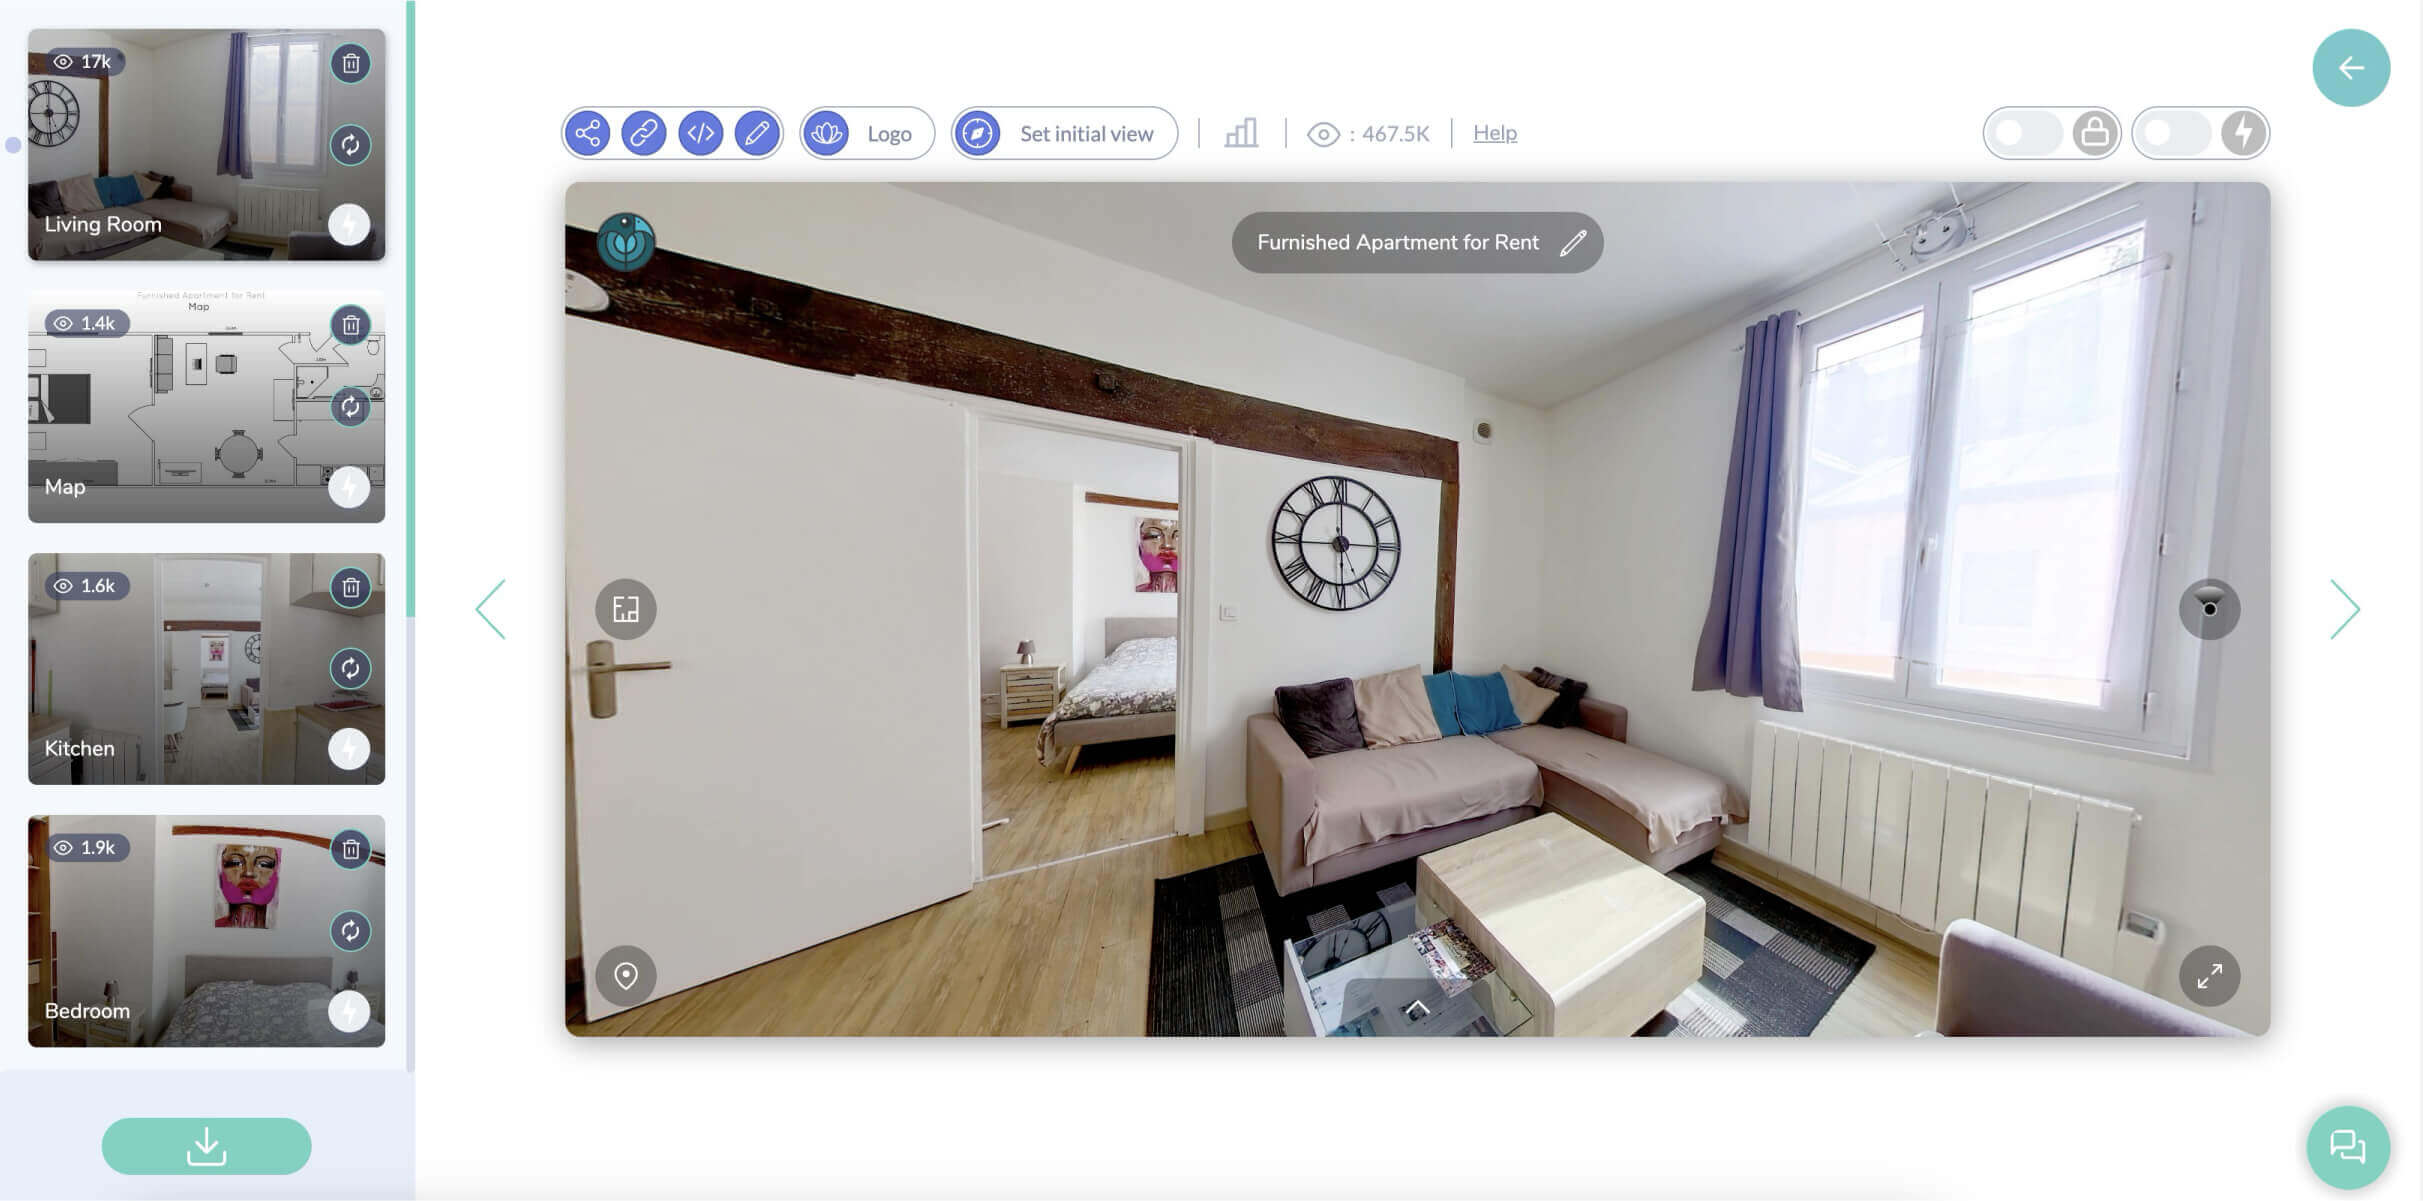
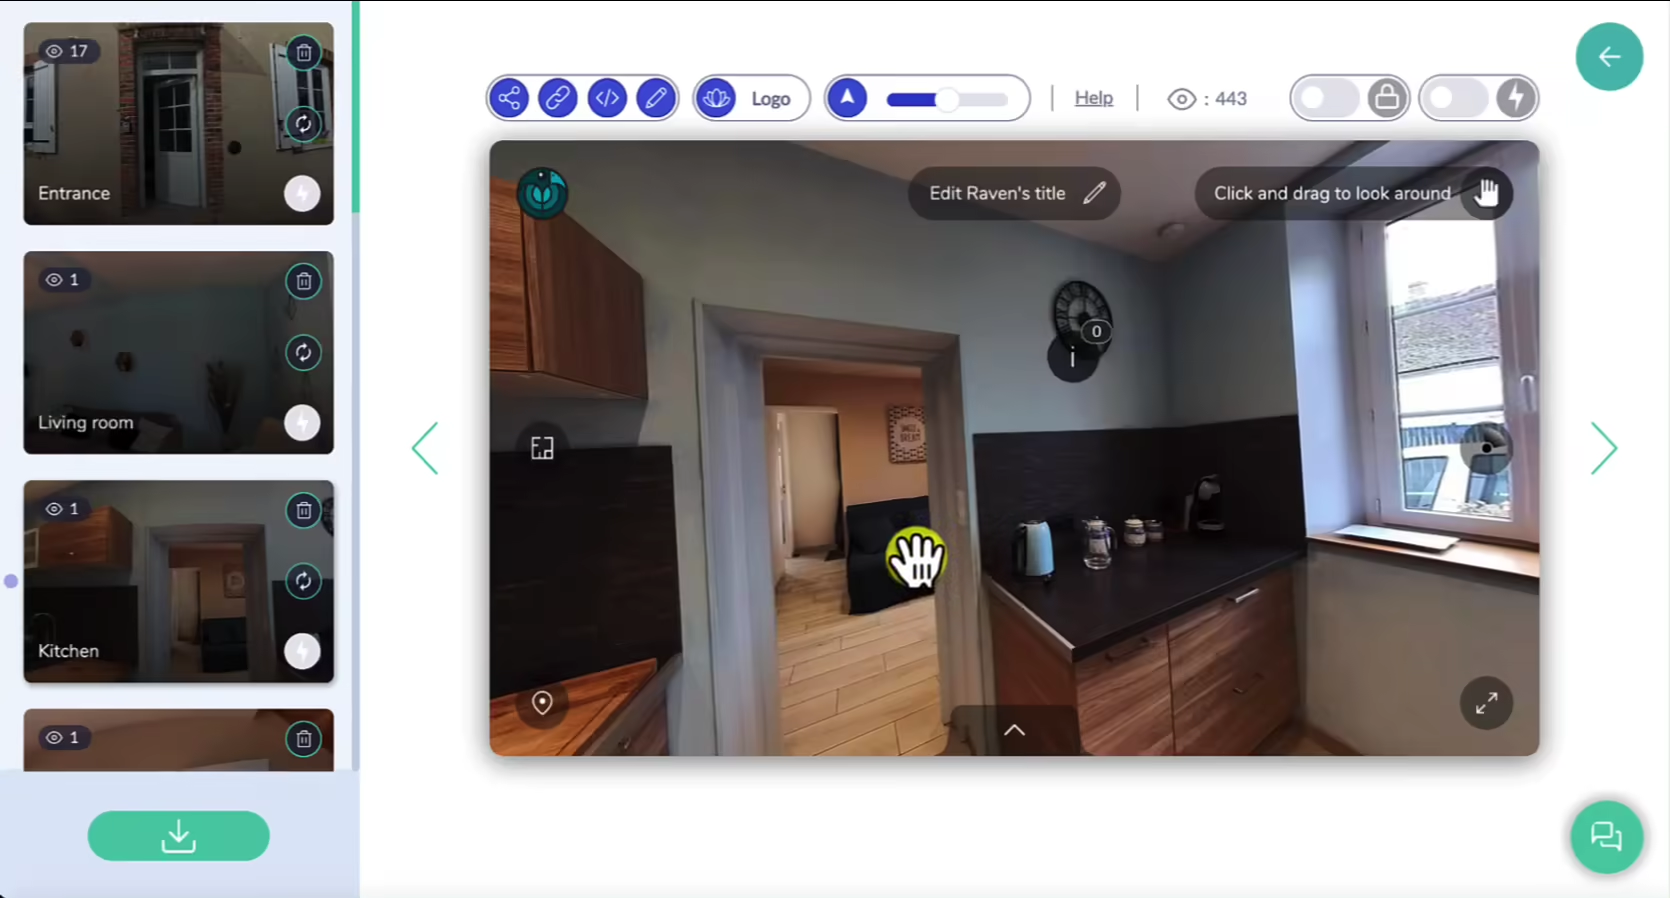
In the left-hand gallery, you’ll find all your uploaded scenes. From here, you can:
- Rearrange scenes: Drag and drop them into the desired order.
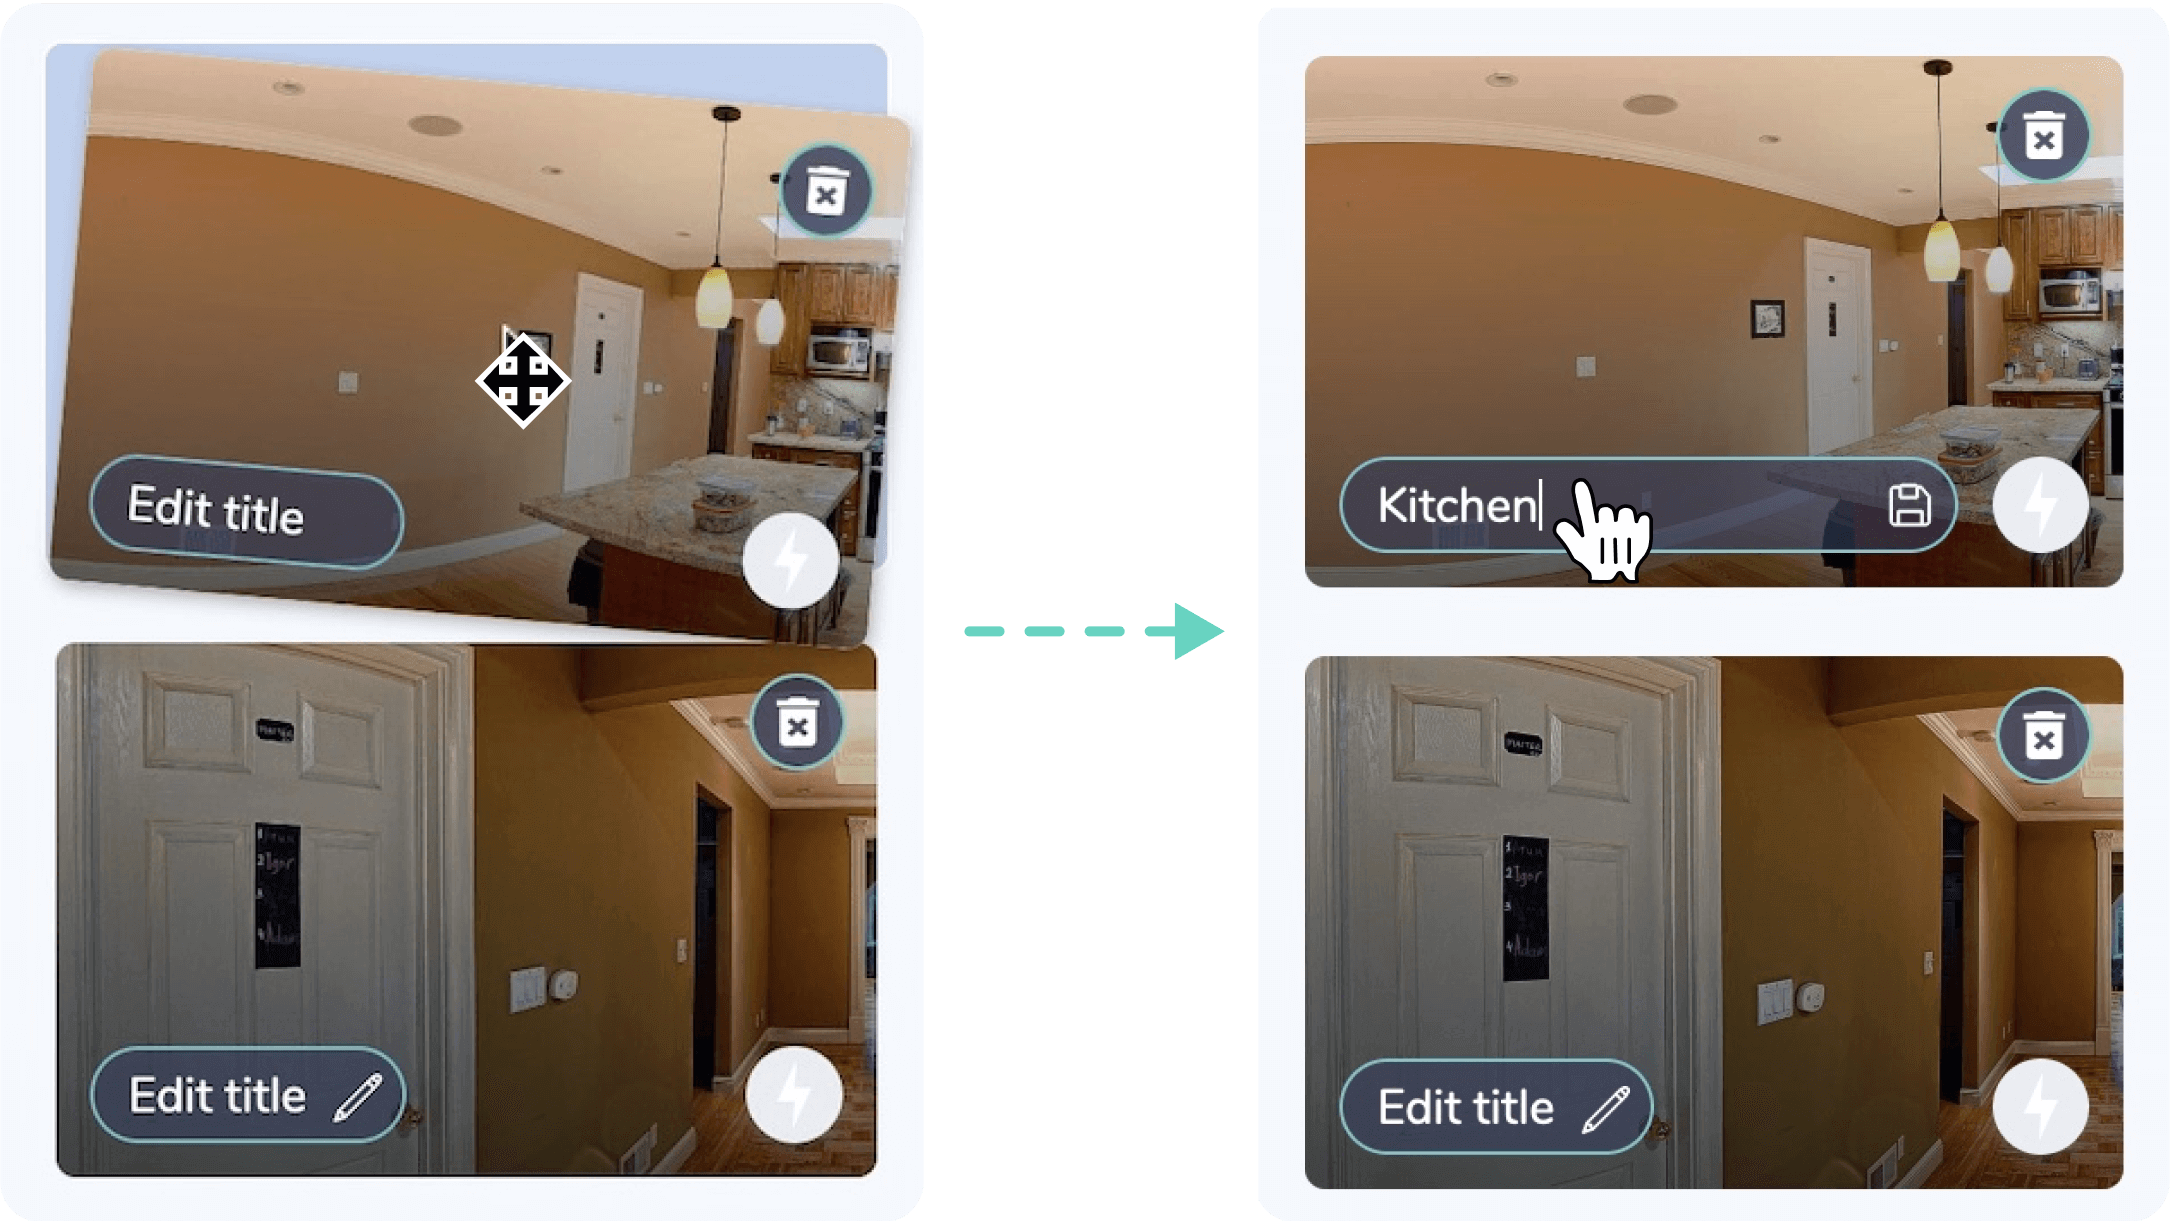
- Rename each scene: For easier navigation.
- Add new scenes: At any time if necessary.
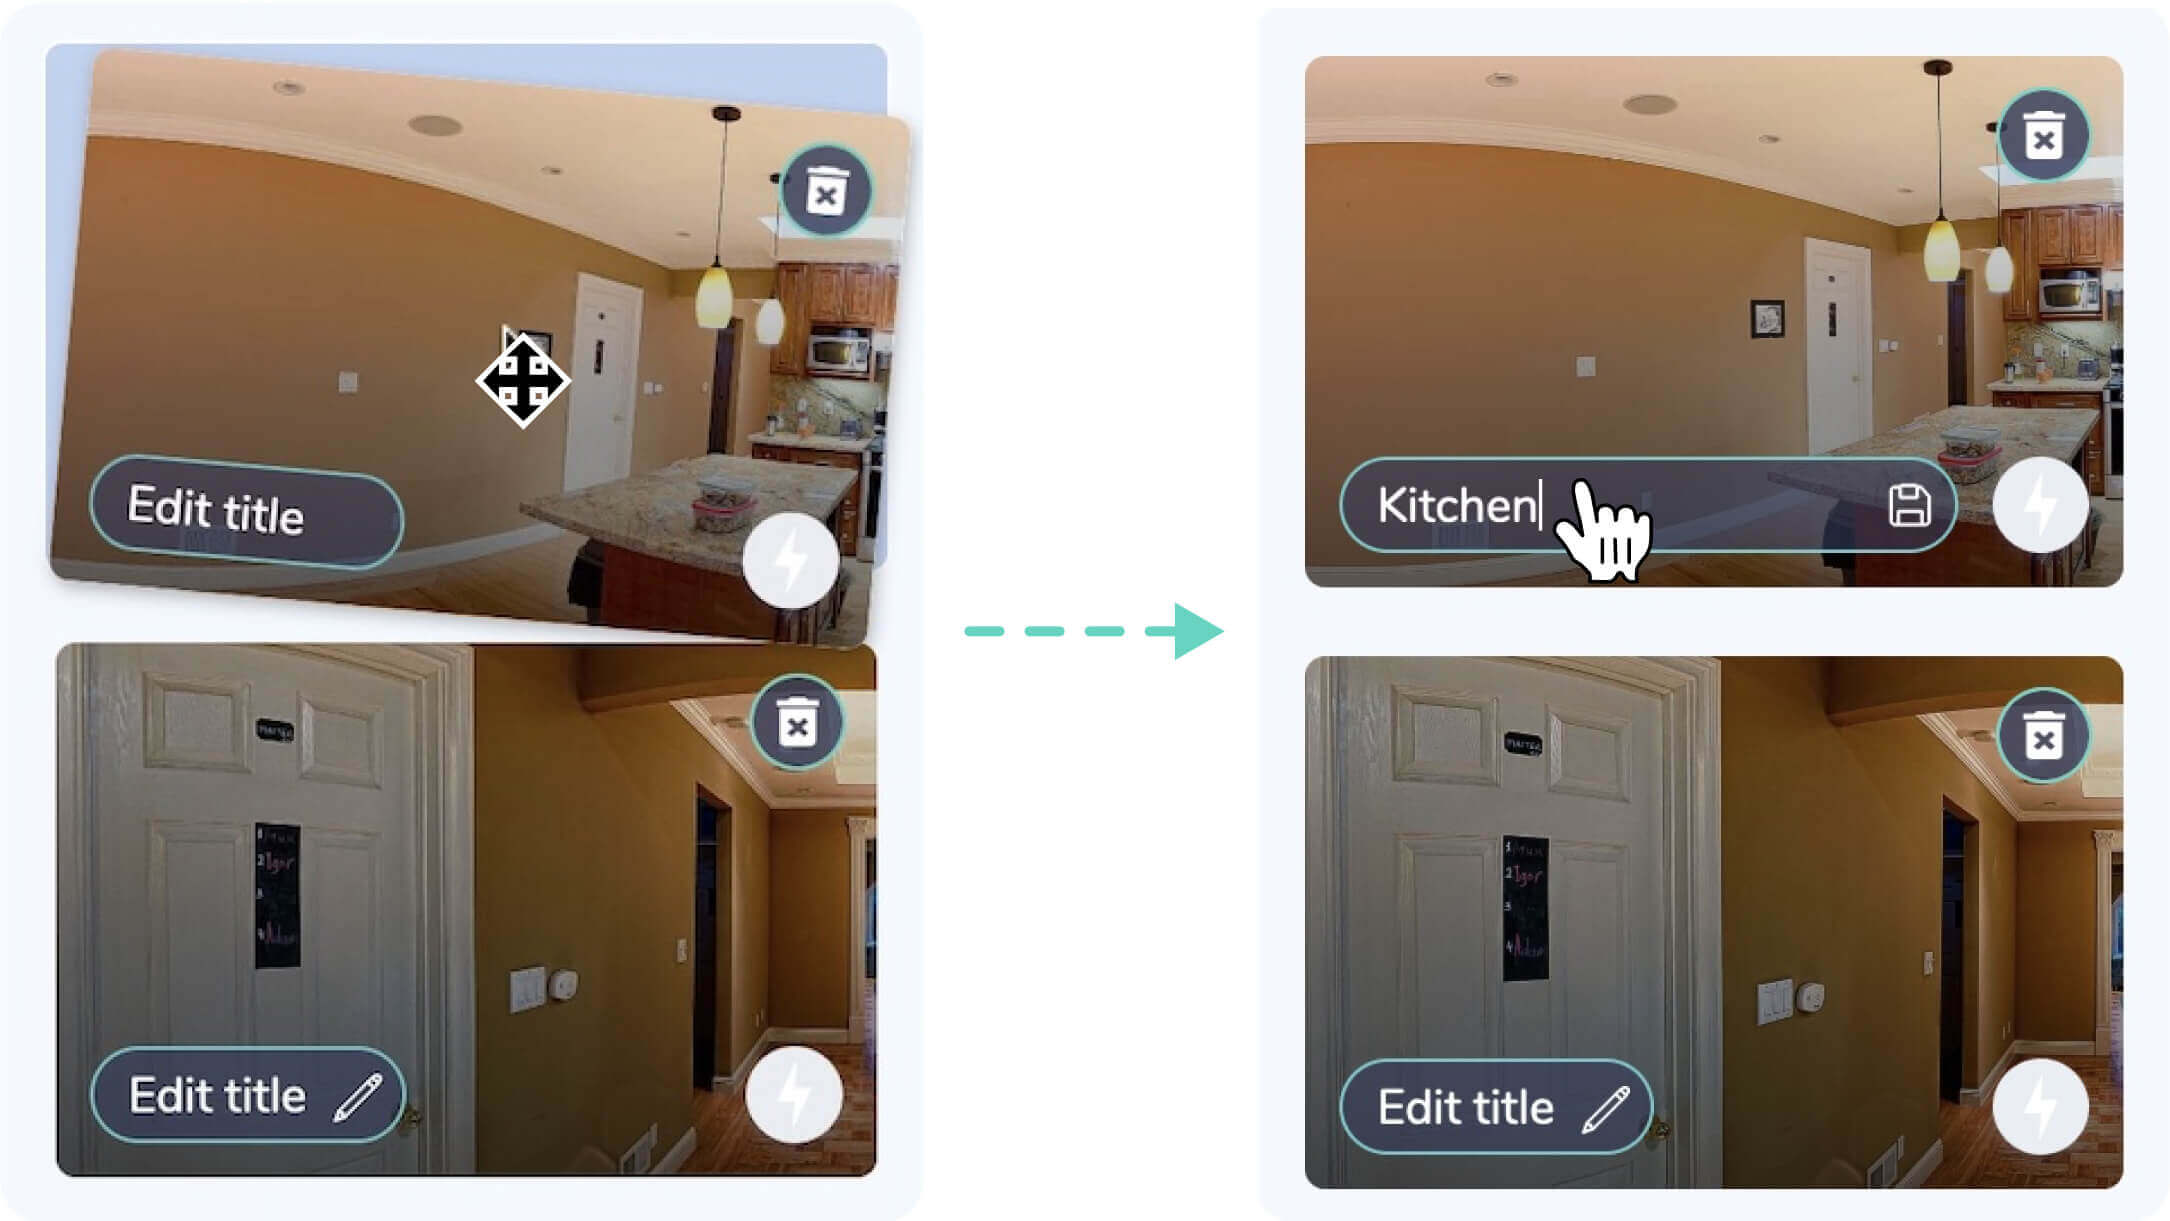
How to name your scenes for a better user experience
📌 Option 1: Rename your files before uploading them (e.g., “Living Room.jpg”). The system will automatically detect these names.
📌 Option 2: Modify scene names directly from the left gallery after uploading them.
💡 Pro Tip: Providing clear and descriptive names to your scenes enhances user navigation and improves accessibility.
You can also name the overall virtual tour directly within the 360° viewer.
Step 3: Adjusting the Default View (Optional)
Sometimes, your 360 images may not be perfectly oriented after upload. To fix this, you can adjust the default camera angle using the ‘Initial View‘ feature located in the viewer’s top menu.
This option allows you to fine-tune the starting perspective for each scene, ensuring optimal positioning.

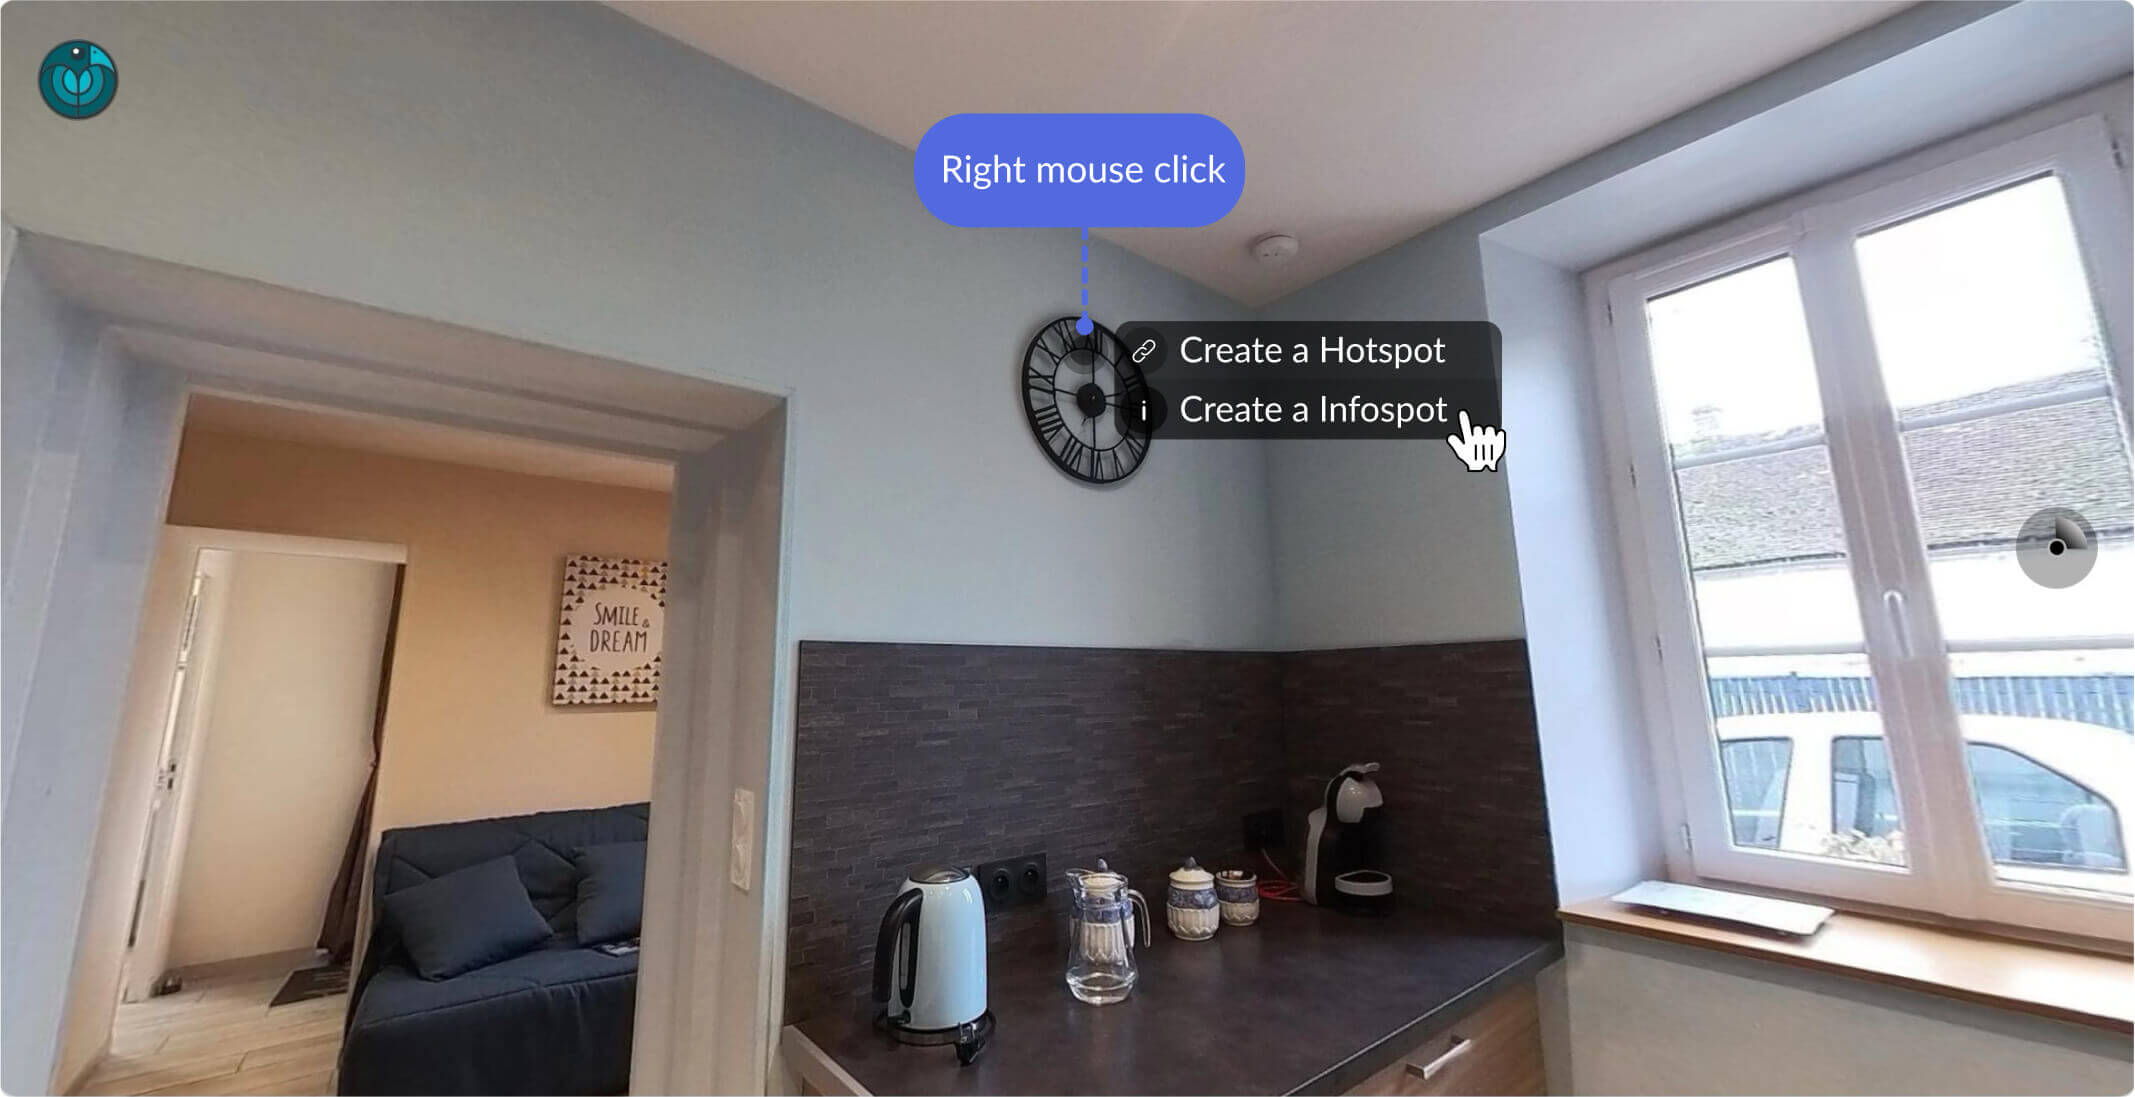
Step 4: Adding Interactive Hotspots
Hotspots are essential for creating an interactive 360 virtual tour. They allow users to navigate seamlessly between scenes by clicking on designated points within the image.
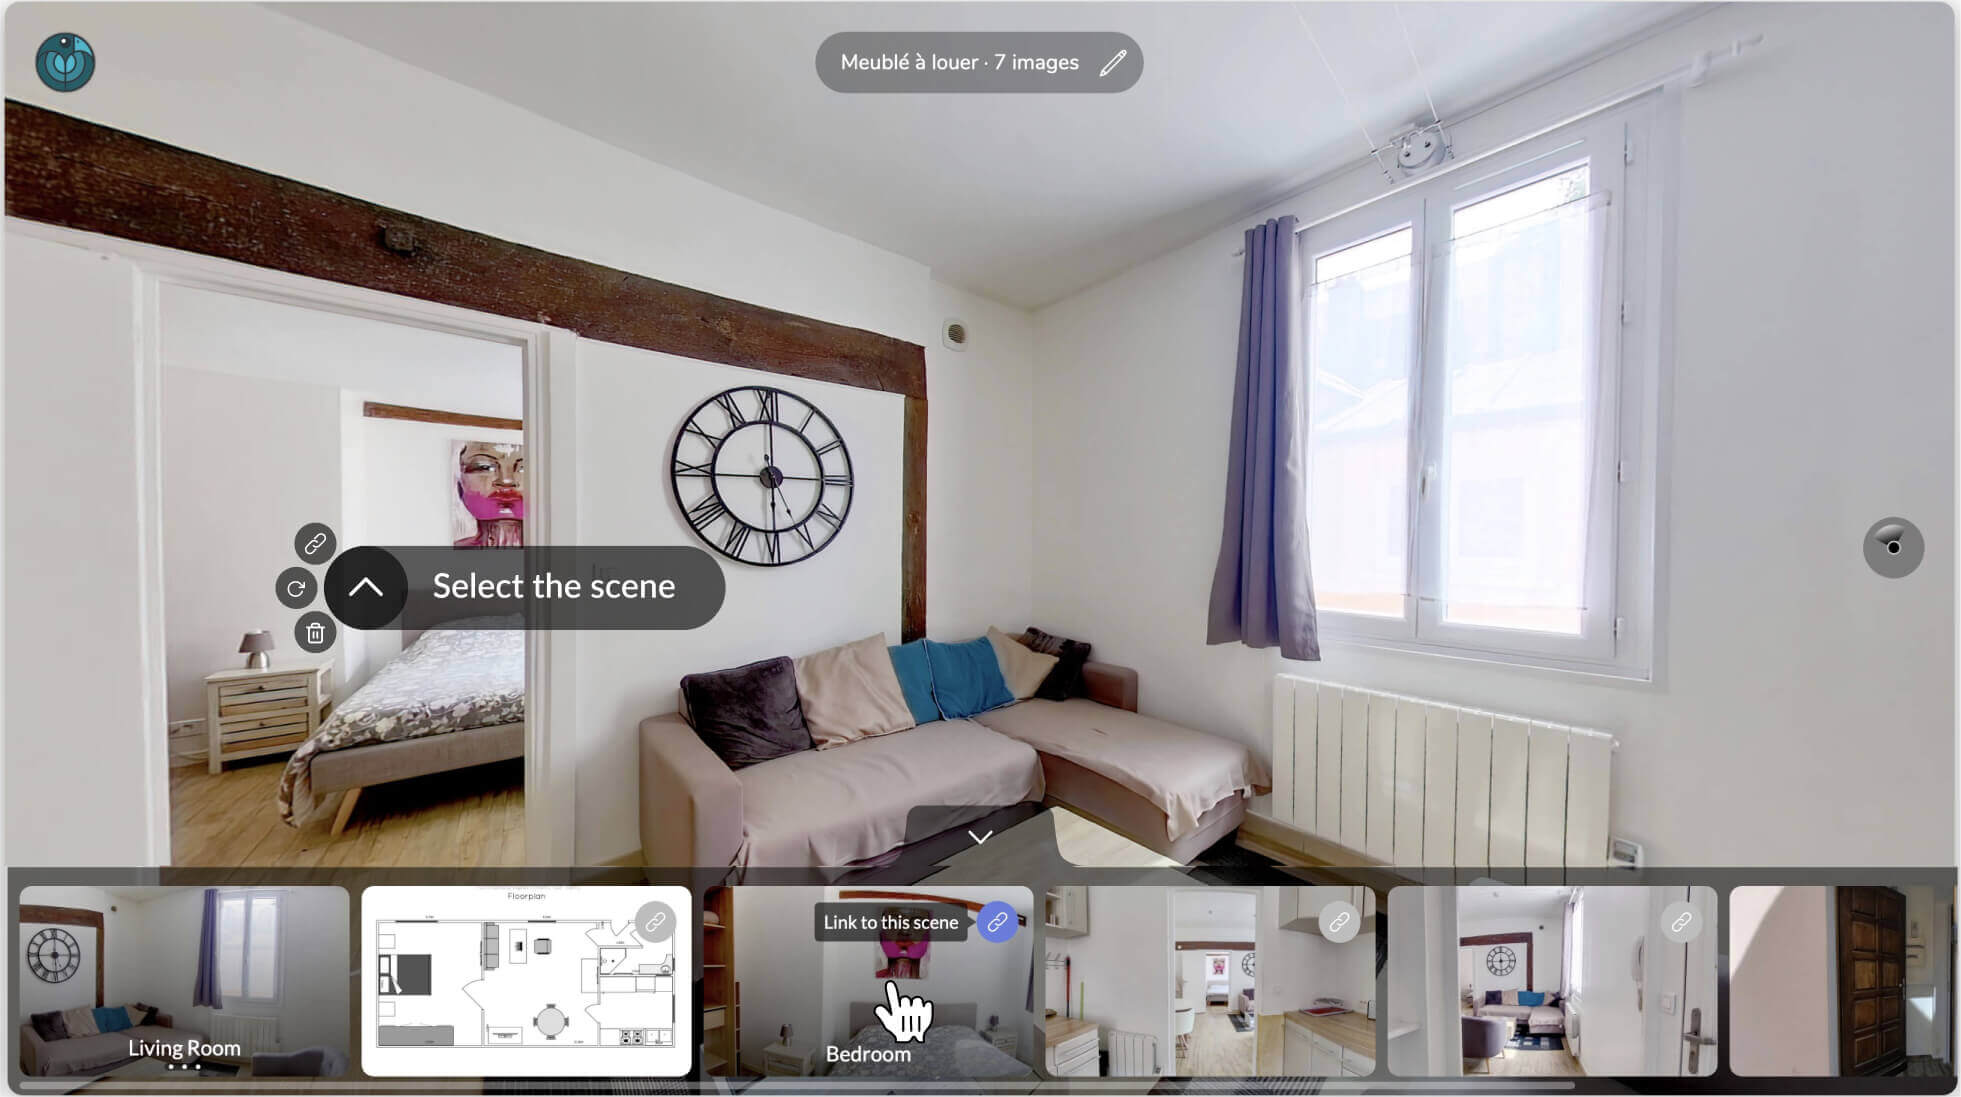
There are multiple ways to create a hotspot, but the method we recommend—because it’s both simple and efficient—is done from the left-side gallery. Simply drag the destination scene from the gallery and drop it into the 360° viewer, in the exact location where you want the hotspot to appear.
Alternatively, right-click directly on the image in the 360° then select ‘Create a Hotspot’.
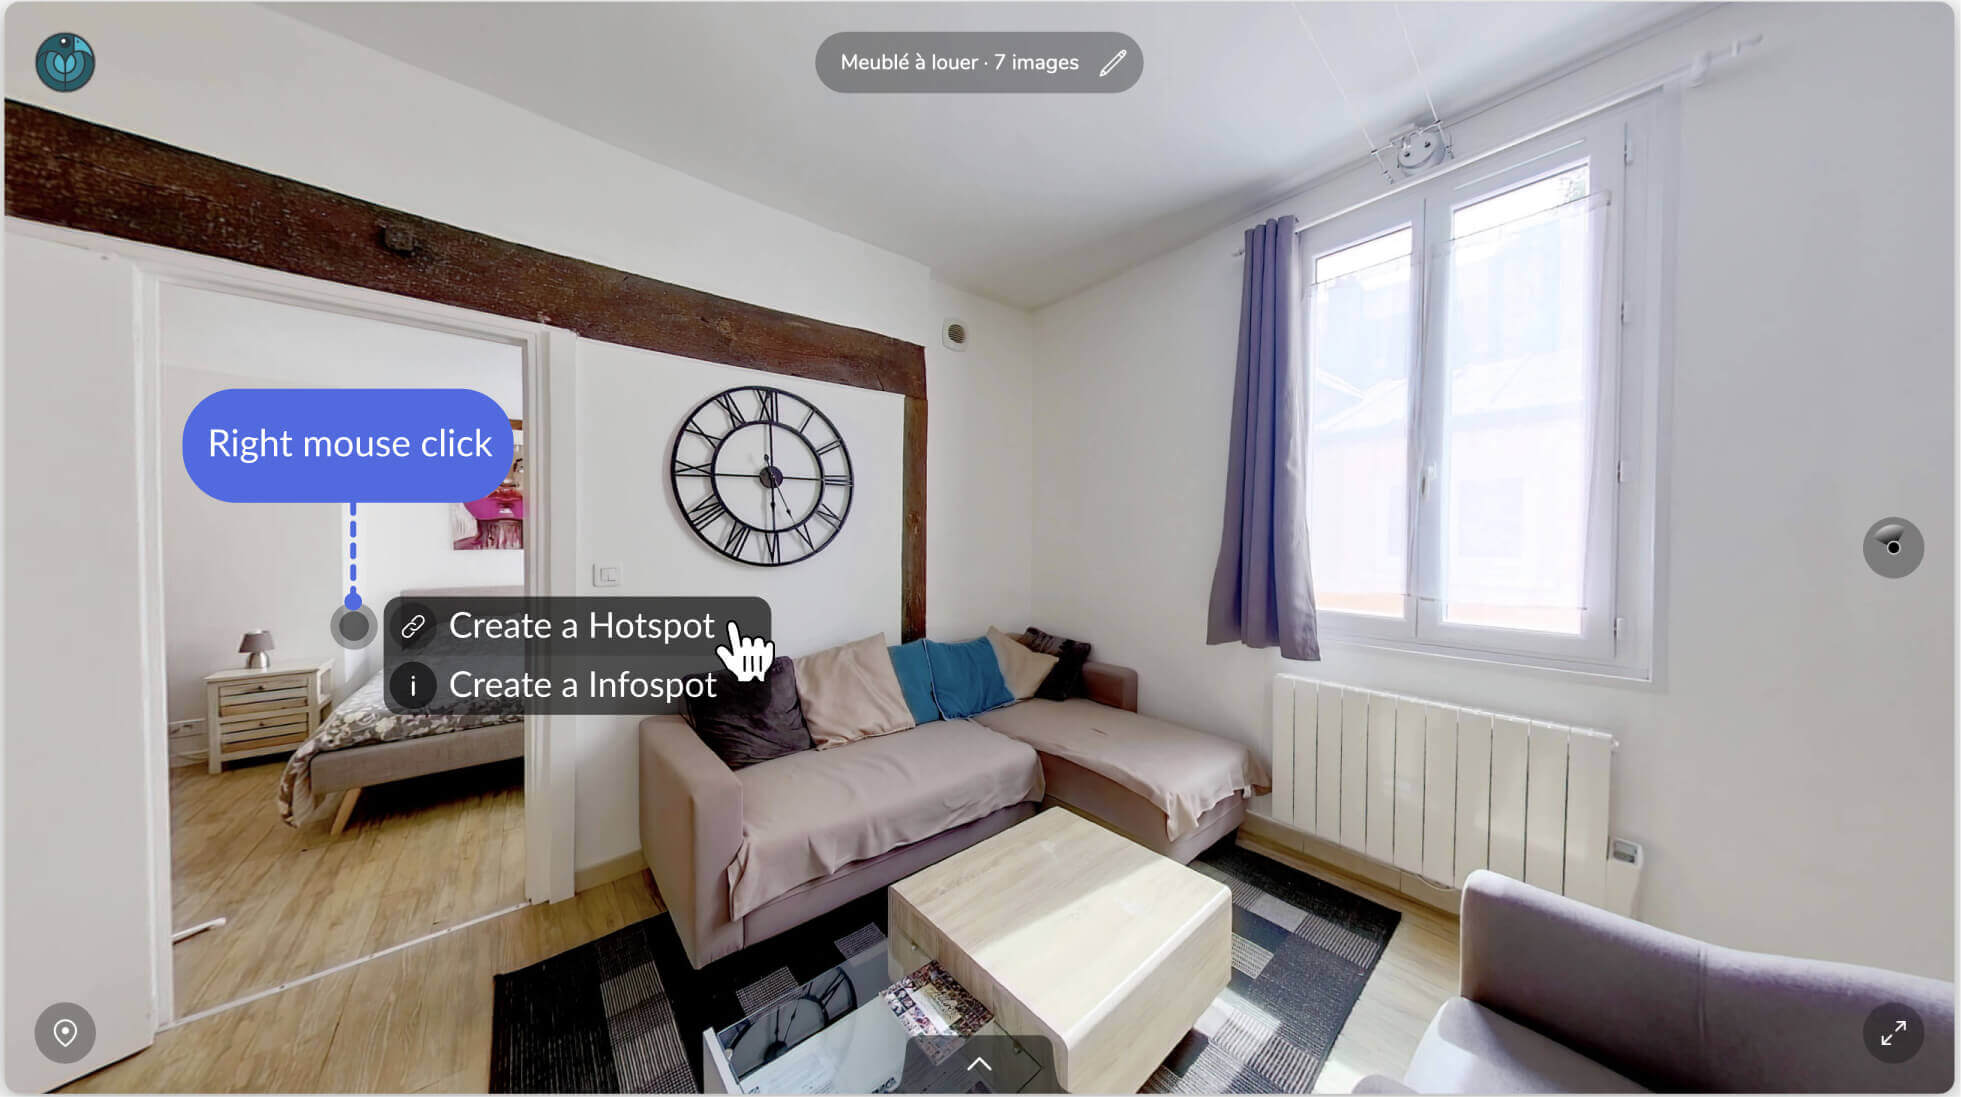
Once created, the hotspot will automatically appear within the image. At the bottom of the viewer, a gallery displaying all available scenes will open. Click on the scene you want to link to the hotspot.
You can modify hotspots at any time after creation. You can:
- Move them to a different location.
- Change the arrow direction.
- Modify the linked scene.
- Delete them if necessary.
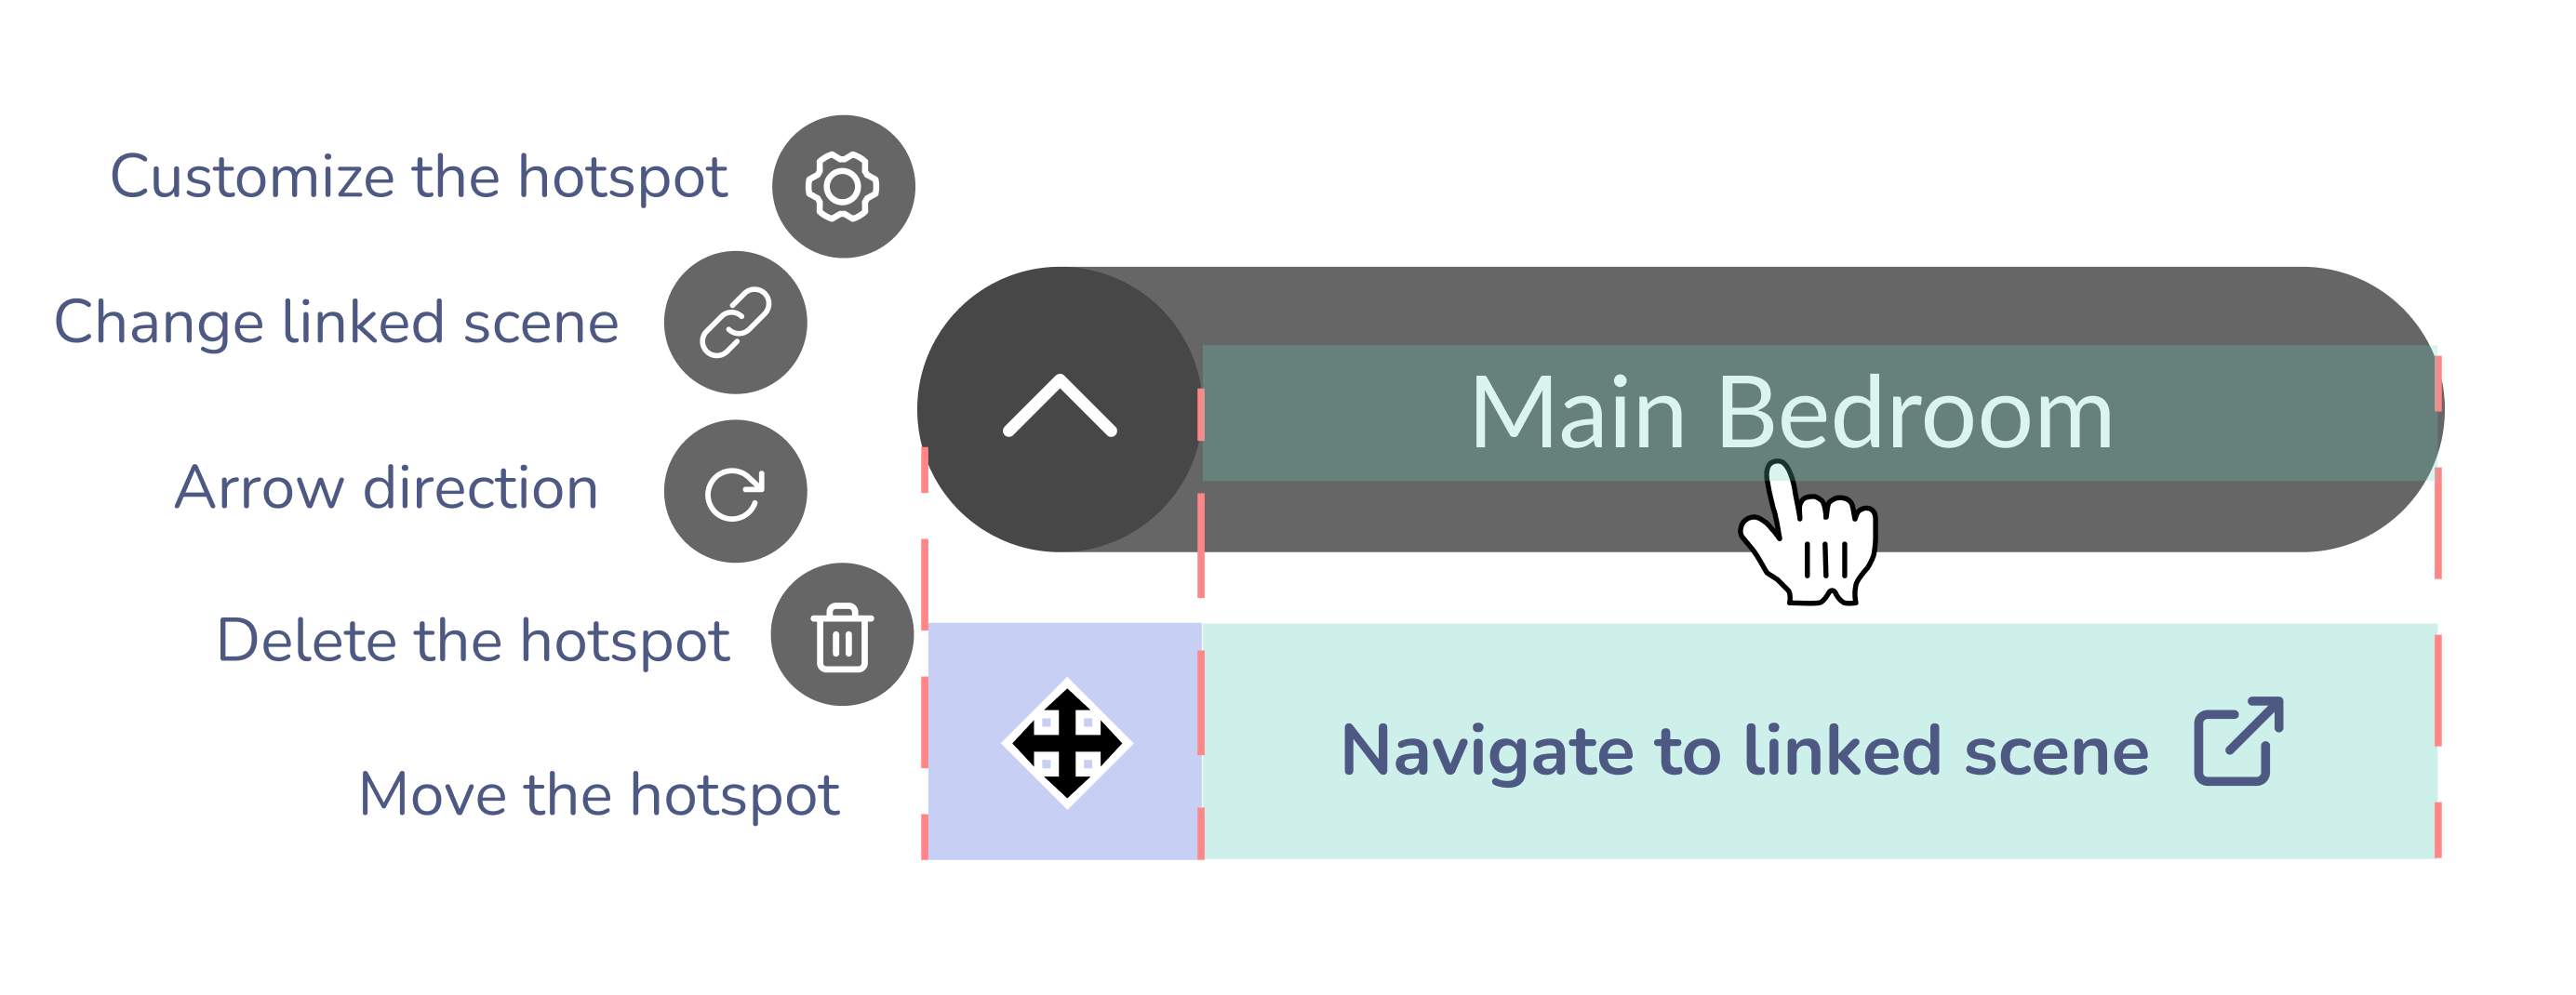
If you want to customize the appearance of hotspots, click the ‘gear’ icon to adjust their design, colors, animations, or even upload your own icons.
Step 5: Adding information Points to your 360 virtual tour (Optional)
In addition to navigation hotspots, you can add infospots—interactive points that provide additional details about specific areas within your 360 virtual tour.
Right-click anywhere inside the 360° viewer, and select “Create an Infospot”.
Similar to hotspots, you can customize infospots to fit your needs. You can:
- Modify the icon and color.
- Add descriptive text or images.
- Attach a clickable external link for users who want more information.
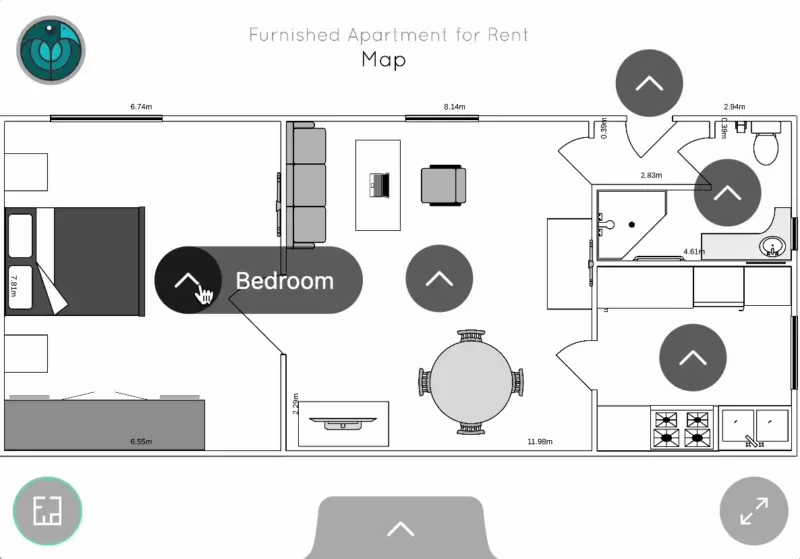
Step 6: Add a floor plan to your 360 virtual tour (optional)
The virtual tour in the introduction embeds a floor plan from which you can navigate from one room to the other. Adding a floor plan to your 360 virtual tour enhances navigation by providing a map-like overview of the entire space.
If you don’t have a floor plan for your tour, don’t worry! You can use one of those 3 free software to make your floor plan from scratch. For instance, we designed the floor plan below using Lucidchart, a simple yet powerful free tool.
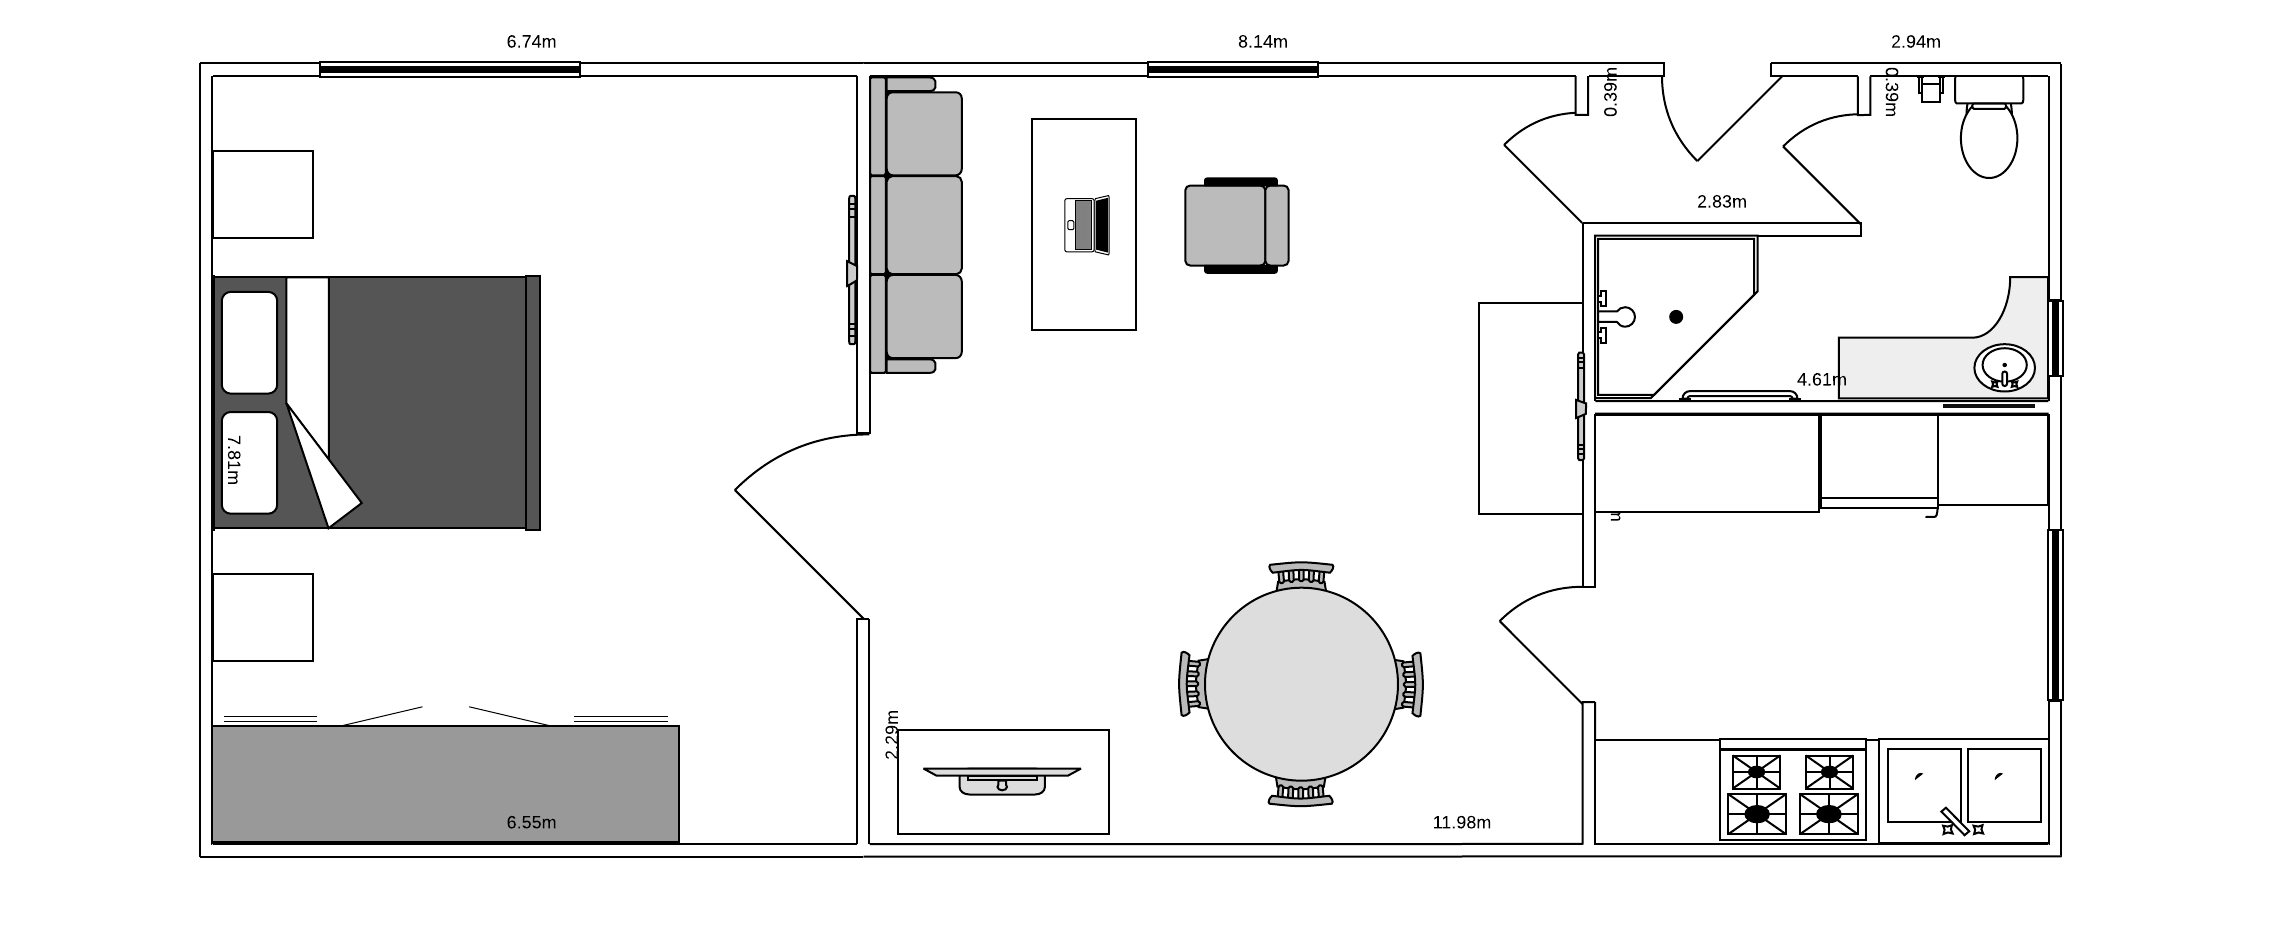
Once your floor plan is ready, save it as a PNG or JPEG and upload it to your virtual tour. It will then appear in the 360° viewer as a standard image.
Now, to activate it as a floor plan, follow these steps:
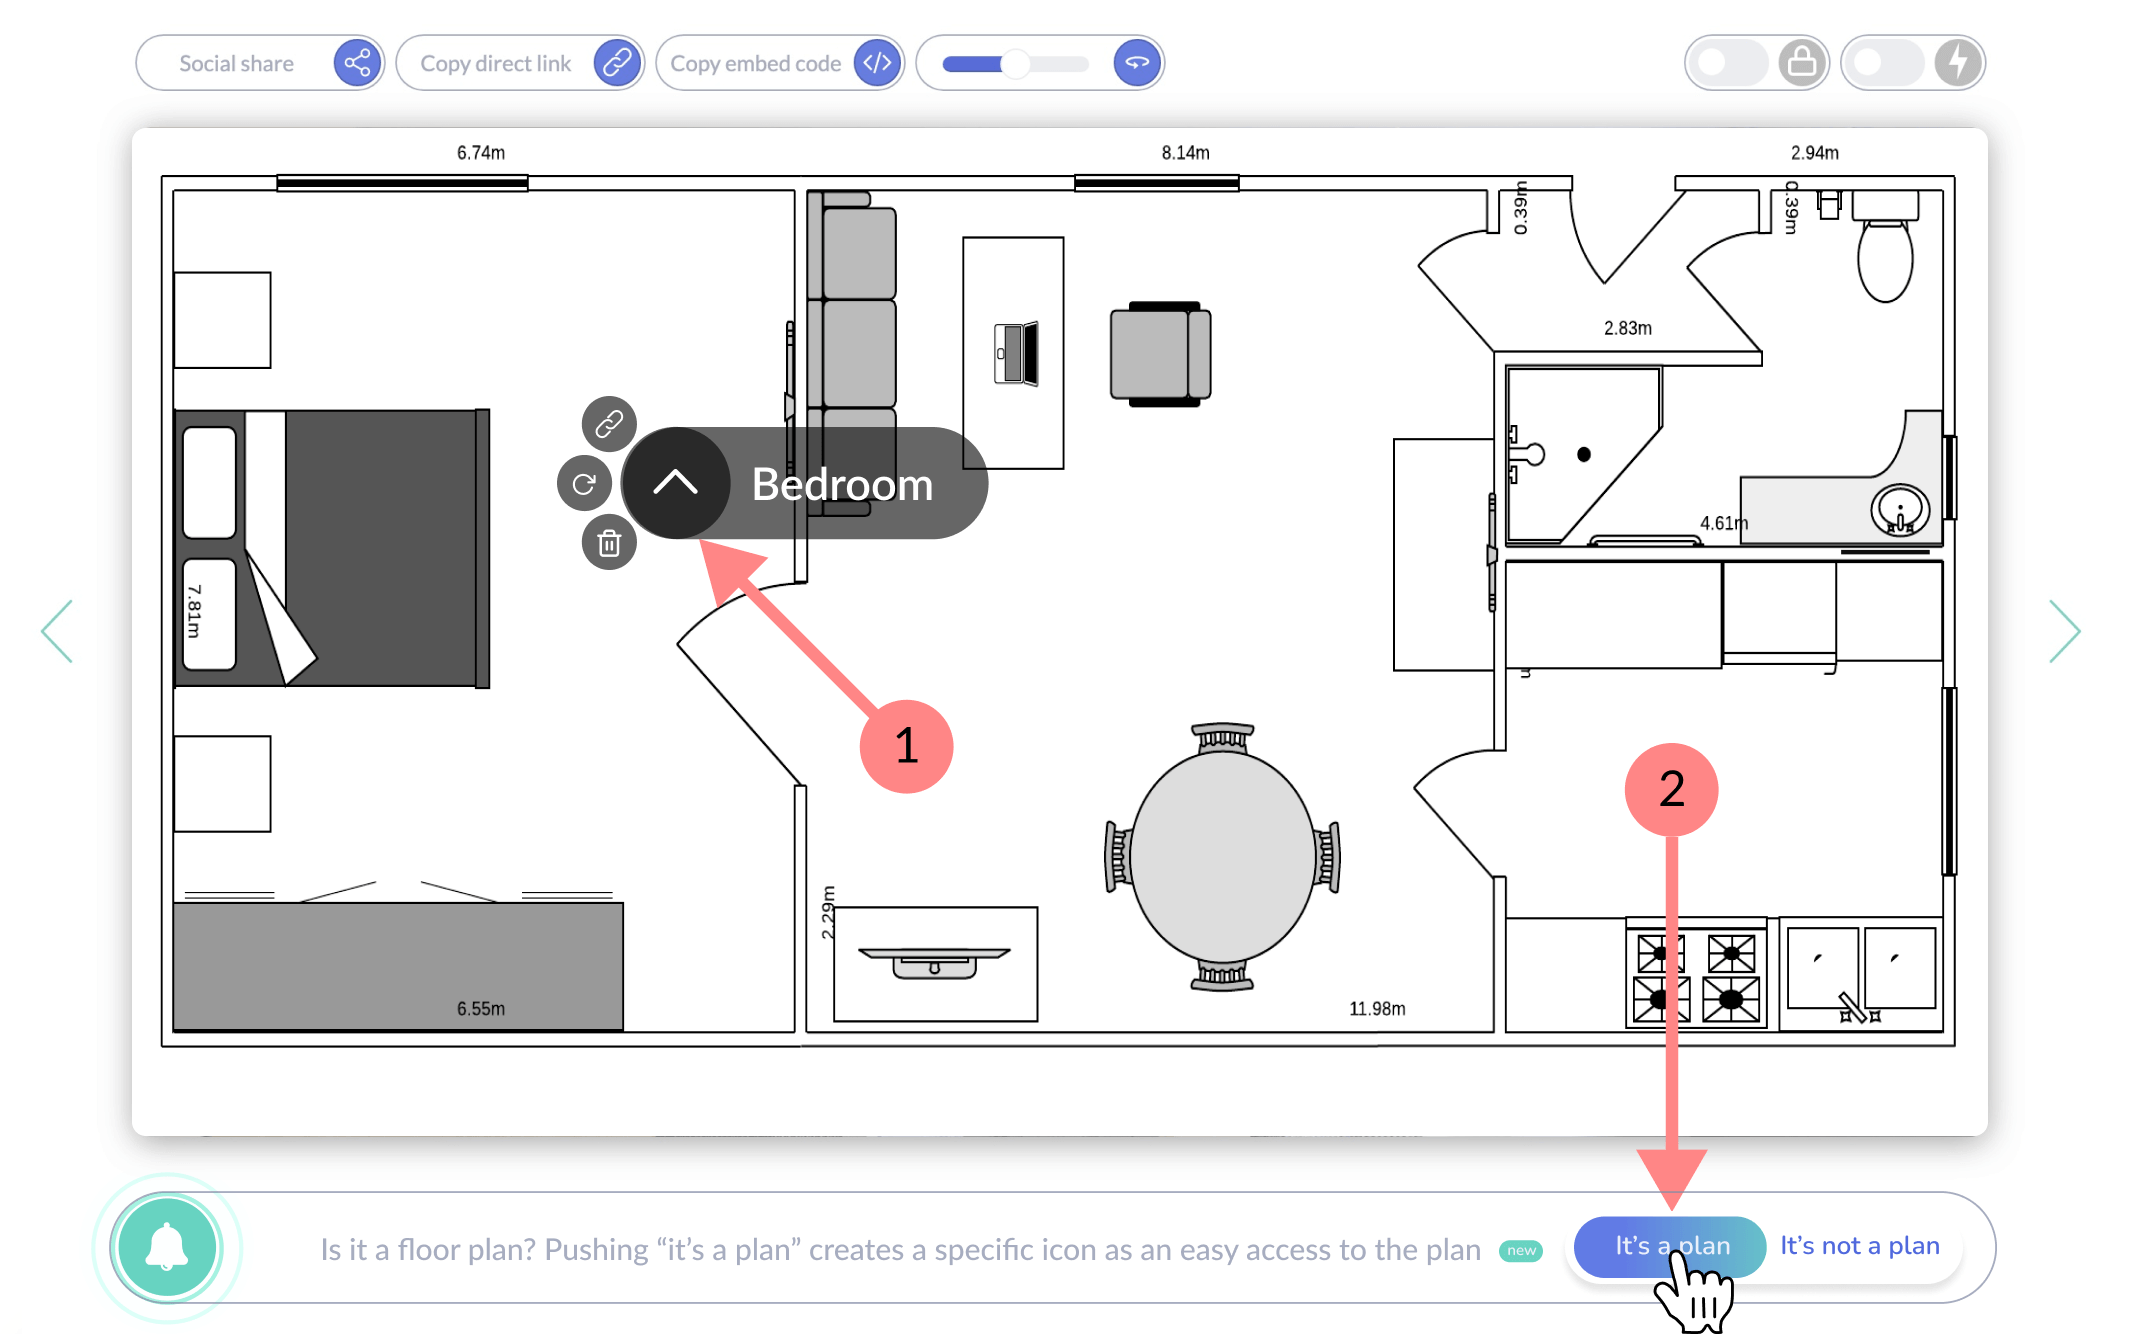
1️⃣ First, add a hotspot inside the floor plan. Right-click anywhere on the image and select “Create a Hotspot.”
2️⃣ A dialog box will open, asking you to confirm that this is a floor plan. Click “This is a plan” to enable the feature.
Step 7: enhancing image quality (Optional)
Want to improve the sharpness and overall quality of your 360° images? With Panoraven’s Super-Resolution feature, you can enhance details and increase image clarity using advanced AI-powered technology. This feature is especially useful if your original images appear slightly blurry or pixelated. To learn more about how it works, check out our dedicated article: How to Increase the Resolution of a 360° Image.
To activate the Super-Resolution, follow these steps:
1️⃣ Locate the Super-Resolution button in the top-right menu of the 360° viewer.
2️⃣ Click to enable the feature, and let AI process your image automatically.
3️⃣ Wait for the enhancement to complete—the processing time will vary depending on the image resolution.

Important note: Since Super-Resolution increases the number of pixels in an image, it may slightly increase loading times. However, most of the time, the improved image quality makes it a worthwhile trade-off, especially for professional presentations.
You can also toggle the Super-Resolution feature ON or OFF at any time to compare the before-and-after results and decide which version best fits your needs.
How to share your 360 virtual tour
Now that your 360 virtual tour is complete, it’s time to share it with the world!
Embed a virtual tour on a website
To embed the tour on your website, click the ‘code’ icon in the toolbar above the viewer to copy the embed code. Then, paste it into your website’s HTML where you want the tour to appear. This ensures seamless integration, allowing visitors to explore it without leaving your site.
If you need more details about this process, you can refer to our dedicated article on embedding a 360° photo on a website. We also have a specific guide on how to integrate a 360 virtual tour on WordPress.

Share via Facebook, Twitter, WhatsApp, SMS or email
Click on the “Share” icon to access the sharing options for Facebook, Twitter, and LinkedIn. If you’re on a mobile device, you’ll also see the option to share your virtual tour via WhatsApp or SMS.

To share your 360 virtual tour via email, simply click on the “Mail” icon. This will automatically open your default email client with a new message containing the direct link to your virtual tour. Your recipient just needs to click the link to access the tour instantly.
Share via Direct Link
If you want to send your 360 virtual tour using Gmail or another messaging platform, the easiest way is to copy the direct link and paste it into your message. To do this, click on the “Direct Link” icon, copy the URL, and send it to your contacts. This allows them to access the virtual tour with a single click, no matter which device or platform they are using.

To summarize!
360 virtual tours have become an essential tool for businesses looking to enhance customer experience and boost sales. They provide a fully immersive, interactive way for users to explore spaces remotely, making them invaluable in industries like real estate, retail, interior design, and tourism.
To create your own 360 virtual tour, follow these key steps:
✅ Sign up for a free Panoraven account.
✅ Organize and customize your tour.
✅ Add interactive hotspots and infospots.
✅ Enhance image quality using Super-Resolution.
✅ Share your tour easily via website embeds, social media, or direct links.
We hope this complete guide helps you successfully create your first 360 virtual tour! 🚀
If you have any questions or feedback, feel free to reach out via live chat—we’d love to hear from you!
Flash tutorial: Create a 360° virtual tour
How to create a 360 virtual tour
- Log in to your Panoraven account
Log in to your account or create your account for free. Once logged in, you’ll be redirected to your dashboard.
- Upload your images
Be sure to click ‘option 1’ to integrate all uploaded scenes into the same virtual tour.

- Reorganize and rename your scenes
A coherent order and explicit names of your scenes optimizes the user experience.

- Create navigation points (hotspots)
Drag and drop the scene onto the 360° viewer to create a hotspot. If needed, add more hotspots or information points to complete your 360 virtual tour.

- Share your 360° virtual tour
Share your 360 virtual tour using the controls at the top of the 360 viewer.